s DRY-BRINED TURKEY WITH ROASTED ONIONS ***
s 
|
s DRY-BRINED TURKEY WITH ROASTED ONIONS ***
s |
|
Ingredients
|
|
||||
|
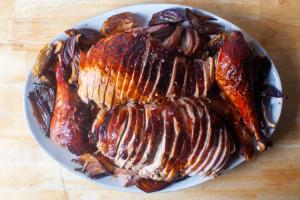
Instructions *** thanksgiving 2019 ok turkey didn't seem totally cooked, onions sort of mushy or burnt *** For 13 years, this site has not had a turkey recipe for a few, perhaps not terribly convincing, reasons. I don’t usually host; it’s usually a family member with, I’m sure just coincidentally, more than a 2-bedroom apartment of space. Second, I mean, this is the internet, right? And there are, as of this morning, 200,000 search results for “roast turkey.” Probably there’s a gem or two in there for you and you’ve got this covered? Finally, the truth: turkey has never been my favorite bird. I mean, when it’s done well, I do enjoy my yearly two slices (dark, please), but I’ve rarely been summoned with the motivation to finetune a recipe in the off-season. But then a couple things changed. A few years ago I started hosting Friendsgivings (see here and here) and now, a few turkeys later, I — inevitably — have a lot of opinions about turkey. For example, when you’re making a turkey the size you need for the 18 to 25 people most Thanskgivings may entail, you’re going to want to find a way to treat the bird in a way that it won’t dry out in all of the hours it will take to safely cook through. I’ve wet-brined (a nightmare with delicious results, but still a nightmare) and dry-brined, and the latter was the clear winner. lots of onions My second opinion is that if you’re putting anything besides a lot of quartered onions under your turkey, you’re missing out on one of the best things we have ever eaten. I tried it after rejecting the usual medley (potatoes, carrots, or other vegetable) because they were represented more generously in other side dishes at the table. I never looked back. Over a few hours in the oven collecting buttery, salty drippings, they become otherworldly: both deeply caramelized to the point of jammy sweetness, but charred and salty too. There’s enough to go around. Since they will taste too good to share, however, I might take this time to remind myself of the key Thanskgiving themes: generosity, gratitude, hospitality, and probably not standing in the kitchen eating onions off a knifepoint? Okay, fiiine. butter-maple-chile paste My third opinion is, in fact, my view on All Things Thanksgiving: Thanksgiving recipes should be rivetingly simple, the kind of short ingredient list, high reward stuff that has no mise-en-place, because all of my dishes are otherwise engaged when I’m having 21 people over. If I can make a stunning, perfectly cooked, delightfully-seasoned, crisp-skinned turkey with merely 6 ingredients and 2 steps, I’m simply not going to make the one with 15. Not today, St. Martha. This turkey follows the rules. I took a risk the first year and kept it really basic, seasoning with only salt, and pepper, and basting with butter after brining and seasoned, juicy, and delicious. However, now I’m hedging, just slightly, on this, because I accidentally did what I thought I never would: tested a turkey recipe when the month didn’t require it. dry-brined turkey with roasted onions Earlier this year, I made a slow-roasted whole chicken and ended up brushing the well-salted skin with a mixture of butter, maple syrup, and gochujang chili paste and it was astoundingly good but I had this nagging feeling it this chicken wished it was a turkey. Hear me out: turkeys are slow-roasted birds; turkeys are wonderful with a salty-spicy-sweet finish. And unlike many other hunches in my life (no we’re not going to talk about the wide-leg mom jeans today), this one was actually on-point, and we get to reap the burnished, delicious rewards. dry-brined turkey with roasted onions PREVIOUSLY Six months ago: Raspberry Crumble Tart Bars One year ago: Drop Cornbread Biscuits Two years ago: Endive Salad with Toasted Breadcrumbs and Walnuts Three years ago: Cheesecake-Marbled Pumpkin Slab Pie Four years ago: Apple Cider Sangria and Date, Feta, and Cabbage Salad Five years ago: Pickled Cabbage Salad and Pretzel Parker House Rolls Six years ago: Cranberry-Orange Breakfast Buns and Green Bean Casserole with Crispy Onion Seven years ago: Spinach Salad with Warm Bacon Vinaigrette Eight years ago: Gingersnaps Nine years ago: Upside-Down Cranberry Cake and Sweet Potatoes with Pecans and Goat Cheese Ten years ago: Swiss Chard and Sweet Potato Gratin and Sweet Potato and Buttermilk Pie Eleven years ago: Pepita Brittle and Chickpea Salad with Roasted Red Peppers Twelve years ago: Roasted Stuffed Onions and Simplest Apple Tart Thirteen years ago: Chocolate Stout Cake Dry-Brined Turkey with Roasted Onions SERVINGS: 12 TO 16 TIME: 4 TO 5 HOURS FROM REMOVING FROM FRIDGE TO SERVING, PLUS 1 TO 2 DAYS DRY BRINE SOURCE: SMITTEN KITCHEN Read the notes at the end first, pretty please. 1 12- to 16-pound fresh turkey Kosher salt 4 tablespoons maple syrup 1/2 cup unsalted butter, melted 1 tablespoon of a chile paste — gochujang, harissa, or chipotle — plus more to taste 8 to 10 medium onions, half red, half yellow, peeled and cut into quarters 1 to 2 tablespoons sunflower, safflower, or another high-heat friendly oil 1 to 2 days before serving: Make sure the giblets (usually in a bag) are removed from the turkey’s cavity. Sprinkle all over with kosher salt, using about 1 tablespoon per 4 pounds of bird, including some into cavities. I do this on a rack in my roasting pan. Loosely cover with plastic and place in the fridge for 1 to 2 days, and until 4 to 5 hours before you want to serve it. 1 to 2 hours before roasting: Remove plastic and discard any juices that have collected around the bird. Allow to come to room temperature, which will take 1 to 2 hours. No need to rinse any salt off the bird; it’s all as it should be. 2 1/2 to 3 1/2 hours before serving: Heat oven to 450°F with a rack on the lowest level of the oven. If you plan to stuff the turkey with anything, do so now. Truss the legs (tying them together) with kitchen twine or, uh, any other string you have around. Toss the onions with a splash of oil (don’t worry about seasoning, they’ll collect it from the pan) and arrange around the turkey. Combine 1 tablespoon of the melted butter with the maple syrup and chili paste in a small bowl, whisking until smooth. Brush this — or use your hands to coat — all over the turkey, leaving none behind. Here you’re supposed to tuck the wings under the bird to prevent the tips from burning, something I have never successfully done, if we’re being honest. Have a big piece of foil nearby for when you will want to cover the turkey. Roast turkey for 25 to 30 minutes, then — this is very important — reduce the oven heat to 350° and continue roasting the bird until a thermometer in thickest part of the breast reads 150 to 155. Beginning when you reduce the heat, periodically baste the turkey with 1 to 2 tablespoons of the remaining melted butter, and then, when you’re out of butter, with the juices from the pan. This turkey is going to brown fairly quick and quite dark. Don’t fret, it will not taste burnt, but go ahead and put the foil on when it gets as dark as you can stand it. Rotate the pan in the oven a couple times, and turn onions in pan over once, for even cooking. Remove the foil for the last 5 to 10 minutes of roasting, so the skin crisps up again. A 14 to 16 pound bird takes a total of 2 to 2 1/2 hours of roasting. A 19.5 pound bird once took over 3 hours. Keep in mind that if you’re opening and closing the oven door a bunch of times to move other dishes around, it will take longer to cook (up to 30 minutes). Rest, carve, and serve: Allow the turkey to rest at room temperature 15 to 20 minutes before carving, which you should estimate 20 or so minutes to do, depending on your comfort level. This will allow the juices to be locked in and the turkey to carry over to an internal temperature of 165°F. Use the rest time to rewarm any sides that need it and to make gravy (see below). I am not going to write out carving instructions because I personally cannot do it without watching a video. I pop this or this or this up on my phone (I recommend previewing them earlier and picking the one that works for you), hit the pause button a lot, and do my best. When you slice the turkey, make sure your knife is really, really sharp to get those clean cuts. Do you know what else really clean cuts do? Make people think you knew what you were doing. (I absolutely do not.) Your turkey is going to spill a lot of juices while you carve it. Do you best to collect them (have paper towels nearby, you’ll be glad you do), then pour it over the sliced turkey, plus a final sprinkle of salt and pepper, before serving to keep it warm and seasoned. Arrange onions all around and serve with glee. You totally rocked this; I knew you would. Notes: Buying turkeys: Heritage- or pasture-raised tend to taste a lot better, if you can find them. Estimate 1 to 1 1/2 pounds per person; I tend to aim to the lower range because we don’t love leftovers and there are so many sides. If your turkey is frozen, defrost 2 to 3 days before in the fridge. They say it takes about 1 day per 5 pounds of turkey. You cannot defrost it at room temperature; it’s just not safe. Salt: I use Diamond brand kosher salt which clocks in at 135 grams a cup which is only important to note because the weight over other brands varies significantly, especially at this quantity. Morton brand = 230 grams per cup and David’s = 288 grams. So, please use half or just about half if you’re using another brand to avoid significantly over-salting your turkey. Doneness: Your turkey is done when a thermometer (this remains my go-to) inserted into thickest part of the breast reads 150F to 155F, or in the thigh at 165F, however, I prefer checking the breast. Thighs are smaller and often hit the “done” temperature sooner but are more forgiving of a few extra degrees. Nobody is forgiving of undercooked turkey breast. Logistics: Here’s a logistical tip I don’t think enough recipes make clear: You want to rest your turkey for 20 to 30 minutes before carving it, tented lightly with foil. It’s then going to take 15 to 20 minutes to carve (I had a friend holding a YouTube video tutorial in front of me because I’m very bad at it.) This gives you 30 to 45 minutes of empty oven time where you can reheat sides, which is more than most need. I have a single, not big, not great oven and this is how I manage to make it work. Extra ingredients: This is — and I know this is very bizarre to many people — and herb- and garlic-free turkey. If you’d like, you can toss 1 lemon and 1 head of garlic, each sliced in half crosswise, and a fistful of thyme, rosemary, and/or sage inside the turkey. I’ve made this turkey with none of these things and I’ve made this turkey with all of these things and I want you to know that it’s excellent both ways. The fragrance of the turkey is more dynamic with the lemon and garlic, but it doesn’t make a large difference, in my opinion, in the final flavor of the slices, so proceed as you wish. Cookware: I’m using this roasting pan. Now, let’s talk about gravy. This is my core gravy recipe: Very Simple Gravy 8 cups turkey or chicken stock (I either use homemade chicken or Better Than Bouillon’s turkey base) 1/2 cup unsalted butter 2/3 cup all-purpose flour 2 tablespoons dry marsala or cider vinegar Melt butter in an empty pot or your emptied roasting pan and stir in flour. Cook this mixture over moderate heat, whisking, 3 minutes. Add marsala or vinegar, cooking for another minute. Add stock a little at a time, whisking constantly to prevent lumps, then bring to a simmer, whisking occasionally. Season with salt and pepper. However, there are three ways to approach this. The first, above, straight gravy and it’s ideal for people who do not want to stress about it, don’t want to wait until the more frenetic time when the turkey is out and needs to be curved, and even want to make it earlier in the day and rewarm it. The second is more traditional. You use the same formula but you first pour off drippings that have collected under your turkey. Put them in a glass (or a beaker like this) to allow them to separate. Swap whatever fat accumulates on top with the same amount of butter in the recipe, and drippings with the equivalent amount of broth, and proceed as written. The third is a little riskier, but you only live once, right? Place your roasting pan across two stove burners, and bring the liquid (which is a mixture of fat and juices) to a boil. Deglaze the pan, loosening any stuck bits, with a glug of dry marsala or a wine of your choice. Boil all of the juices off until only the fat remains. Eyeball it — you might have just 2 to 3 tablespoons, or you might have more. Add enough butter to get you to 8 tablespoons. Add the flour, and then, since you’ve concentrated flavors so intensely here, you can replace half of the stock with water, to essentially rehydrate them. Season as needed and cook as you would the core recipe. This recipe published with BigOven, and can be imported instantly by BigOven users. Download your free trial at www.bigoven.com.  |
|||||
|
|
|||||